Photographs for RadCom and the RSGB website
We greatly appreciate photographs sent in for publication in RadCom for Around Your Region, news items, and to accompany articles. Here are some guidelines to help your work appear at its very best.
Click here for the corresponding information on writing an article
Suitable subjects
Anything related to amateur radio is ‘fair game’. Above all we look for interesting images – a row of people holding up exam pass certificates is not as interesting as, say, someone using a radio or writing a QSL card or adjusting an aerial or building a widget. Have a look through RadCom and use it as a source of inspiration for taking your own photos.
People
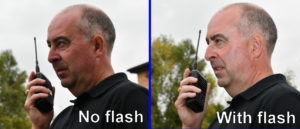
Although it sounds odd, if you are photographing people outdoors, particularly on a sunny day, use your camera’s flash (if it has one) – it brightens up people’s faces and makes them stand out better from the background. (Mobile phone LED ‘flash’ is not normally powerful enough to do this). The example on the right was taken on a dull, overcast day: on a sunny day the improvement is much greater. It also makes a huge difference if you’re photographing things with a wide range of brightness – eg in the tent on Field Day.
Be VERY VERY CAREFUL if your photos include identifiable children: you MUST make sure you have their parent or legal guardian’s permission before submitting their likeness for publication. (It is sensible to have this discussion before you start taking any photos). We can provide specific guidance on request.
Size and quality
Photos must be at least 1024 x 768 pixels (much higher resolution is preferred), in sharp focus, adequately lit and not noisy (grainy) or smeary. Any modern mobile phone is capable of taking photos that easily exceed these requirements – just make sure the lens is clean immediately before use and that you’ve got sufficient, even light. Preference is given to good quality, interesting images of club activities. And please, turn off any camera overprints such as date and time.
Please send us the highest resolution you can get from your camera. If you are sending lots of photos it often pays to use a free file transfer service like Google Docs, Dropbox, jumbomail.me or similar (we have no particular favourite). They let you upload big photos separately from your email, meaning there’s less likelihood of things bouncing. (The RadCom editorial mailboxes can accept emails of over 50MB but your ISP may not let you send mails that big).
We recommend you always take several photos of the same subject and then select the best. When checking photos onscreen, always zoom right in to confirm that the focus is spot on and the image hasn’t got ‘camera shake’ – often, photos look OK when viewed small on a mobile phone or camera screen but are in fact quite badly out of focus and/or noisy when examined full size. If in doubt, take some more photos and send them all.
Don’t be afraid of sending us lots of photos – more than are needed for the article. That means we can select the best for publication, and it’s always useful to have some spares for things like the contents page, website, social media etc.
Image file formats
For photos our preferred image format is high resolution JPG with minimal compression. Most other common photo formats are also acceptable, including various raw file types. If in doubt, please get in touch.
Please do NOT manipulate the photo (colour/contrast, sharpening, cropping) or, especially, overprinting (including date stamps on images). We often have to work quite hard to remove overprinted text to make an image suitable for publication. If you want (or need) particular information to accompany the image, please tell us clearly in writing (eg The photo of the man with the sheep shows Steve, M1ACB and Snowflake – please make it clear this photo is courtesy of John Doe and print “Snowflake” above the sheep).
Screendumps, graphs and other diagrams
For ‘line art’ (particularly screendumps, graphs etc), NEVER EVER SAVE AS JPG. The example (right) shows how badly text can be affected by the JPG compression algorithm. JPG is designed for – and works well on – photographs, but is very poor at handling stuff with straight lines. It also significantly reduces the colour resolution, which makes screendumps and so on look really awful when they’re printed in a magazine no matter how good they may look on your monitor at home. We recommend saving these files as PNG or other format that supports lossless compression (eg TIFF). A number of free software packages are available that will screendump, edit images and save in different formats. Use the highest screen resolution you can, and have the window as large on the screen as possible. The more pixels the better! Never, ever save a screendump or line art as .jpg – once it has been saved that way you cannot reverse the damage.
Please also make sure that the image format you choose supports the necessary range of colours: GIF, for example, has a (very) restricted colour range and often uses dithering; this may look acceptable(ish) on screen but can cause havoc when the file is processed (screened) for four-colour printing.
How to send images
Please send your photos as a full resolution attachment to your email. Don’t accept your email program’s offer of making images smaller! Please do NOT embed images in emails, Word documents or anything else: we really need the highest possible resolution, unedited, as the native file, with no overprint, annotations, or cropping. We can even handle many of the native RAW formats if you have those files available.
If you need to send a lot of image data (over, say, 25MB), it is probably worth using one of the free file transfer services such as Dropbox, jumbomail.me or similar. Please feel free to get in touch to ask for guidance on this or any other topic.
Background clutter and lighting
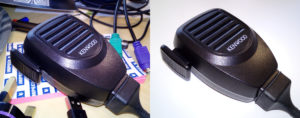
Example bad and good technical photos of the same item. The only change was a sheet of white paper placed under the mic to hide the clutter, but it makes all the difference.
Please make sure the background is as plain and uncluttered as possible. For technical images, put the subject on a piece of unlined white paper (as in the example on the right), or perhaps a clean, unpatterned shirt, a plain tablecloth or even a plain bed sheet.
Do make sure the things you photograph are well lit, ideally without shadows, and that your photos are in sharp focus. Diffused lighting is best (eg outside on an overcast day). Most things can be photographed well by simply putting them on the floor in a well-lit space (use a plain background, discussed above) and then simply standing over the object with the camera pointing down from normal head height, using the camera zoom to make the item appear a reasonable size.
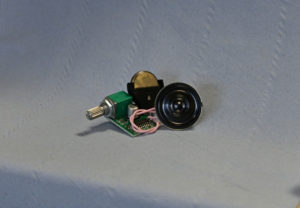
If you have manual control of the camera settings, it’s usually worth setting the ISO sensitivity near its lowest (thus reducing image noise) and using a suitable aperture for a depth of field that ensures the whole item is in focus. (For DSLRs, don’t stop down much below about f/11 otherwise diffraction effects will cause the image to look very ‘soft’, however deep the focus may be in theory). A combination of low ISO and small aperture may well call for a tripod to avoid problems with camera shake. One tip: if you use a tripod, use the self-timer or a remote release so you can avoid even the smallest amount of camera shake. Unless you know exactly what you’re doing, don’t use flash for ‘product shots’ because some areas will ‘burn out’ (like the very centre of the microphone image above).
Stand well back
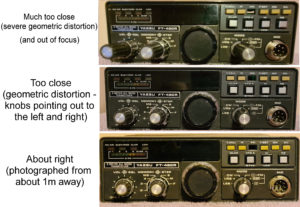
Always be no less than three and preferably five times the width of the subject away from it – use optical zoom (if your camera has it, not digital zoom) to make the subject appear the right size. This avoids the odd bulging effects that you get when taking a photo too close to the subject.
Look at the photos on the right: the top one was taken with the camera much too close – the knobs are pointing out at crazy angles (and the picture is out of focus, too). The middle image was also taken a bit too close – the knobs are still pointing sideways, but less so. The third image was taken from about 1m away and is much more ‘natural’ – the knobs look just like they would if you were looking at the radio in person. However it is slightly out of focus; as mentioned before, zoom right in on your screen to check focus on the photo you’ve taken.
Leave wide margins!
Here’s an example of the sort of technical photo that’s best for us to work with. It is very useful if you can keep a wide, clear margin around the subject, ie don’t have it running right up to the edge of the photograph. Even a 10-20% margin means we get a lot of flexibility in how we crop the image for publication. The example photo of the microphone above does not have anything like enough margin around it.
In the double image below, a blue paper towel serves as a backdrop. The red box indicates roughly the area that should, ideally, be photographed, and the image on the right is one way we might crop the image for publication. But equally we might need to crop it with more margin at the top & bottom, or at the sides, in order to ‘balance’ the page.
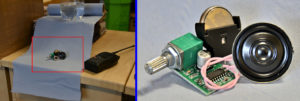
Photo setup, ‘ideal’ image area (red box) and result, as it might appear on a page – but please let US decide on how to crop and process it!
(The image on the right was actually cropped from the middle of the ‘long shot’ on the left, taken with a good camera, then processed from the RAW file to adjust the brightness & contrast).
Copyright
Finally, it is essential that you are either the originator, copyright owner, or have the written permission of the copyright owner for all text and images that are included in the submission. (An exception is that if you are creating a work for publication in RadCom or RadCom Plus you can re-use images that have been previously published in any RSGB publication). Images downloaded from the web, (with very few exceptions such as explicitly public domain images from Wikimedia Commons) generally cannot be used.
The British Library publishes some useful guidance on copyright that’s well worth reading. Using someone else’s material without permission may result in having to pay damages to the copyright owner.

