Get on the air to care… construction competition
This special construction competition was dedicated to projects that had been made during the Autumn 2020 lockdown, the Christmas and New Year holiday period, or the early 2021 lockdown
We were delighted to receive 27 entries from 15 entrants and the standard was very high. To reflect this, the judges awarded four prizes rather than choose a single winner as originally planned. We congratulate each of those four radio amateurs and hope you enjoy reading about their winning entries below.
We encourage every entrant to re-submit their entries for the main RSGB Construction Competition in Autumn 2021.
Winner – Gordon Lean, G3WJG
A 25W HF SDR Transceiver made using GNU Radio and modules bought on eBay
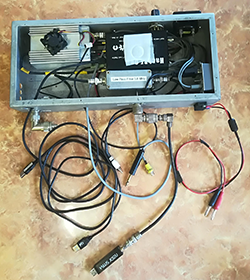
The system I have made in the autumn 2020 lockdown comprises a “Hack-RF” direct RF generation with 1 milliwatt output into a Chinese 45 watt (so-called) HF power amplifier kit. This amplifier has up to 60db gain giving, up to 25 watts output on 80m (and other bands up to 20m). The Hack-RF is run from my own custom Python software, made using the GNU Radio environment. I also use a low-pass filter on the coax to/from the antenna, which is essential, as the harmonics from the amplifier alone are massive (approx 5 watts of energy).
For receive (as the RTL dongle has a minimum operating frequency of ~ 29MHz) I use a Mini-Circuits mixer driven with 28MHz from a Chinese £5 Adafruit synthesizer (no RF amp or IF gain or filters needed). This feeds directly into a Noo-Electric RTL dongle plugged directly into a Linux PC. The RTL dongle receives 80 metres as 31.5 to 31.8 MHz. This was chosen as my shack has a very low noise at this frequency and the dongle and the mixer have no unwanted spurious around this frequency. The 7Mhz band comes out at 35MHz and I can easily change the local osc from 28MHz to something else because it’s a synthesizer. The synthesizer and amp sequencer are controlled by an Arduino Nano without difficulty, as the synthesizer is preset into RAM from the Arduino setup and does not call on the program when it loops for the sequencer functions. The RTL dongle receiver uses Linux GQRX software (unmodified) and will run on a Raspberry Pi if need be.
This HF system was based on experience programming and using a Hack-RF/RTL dongle SDR system for VHF/UHF contests during 2020, after being inspired by the RSGB lectures on GNU radio by Heather Lomond, M0HMO at the RSGB Conventions 1998/9.
The antenna which was made a year ago (pre-COVID) is an indoor loop of 22 feet of solid coax (outer) resonated by a coax stub to be on 3.573 MHz. It was tested with 100W to withstand 2.5KV easily.
Further work for 2021 will be to see how much of the entire system will run on a raspi 4b and can be remote controlled.
![]()
Runner up – Paul Graham, M0PGX
LEO satellite antenna rotator
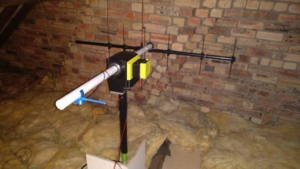
I’ve been making a LEO satellite antenna rotator that is easy to reproduce, providing you can solder and have a 3D printer. It’s probably best suited for in the loft or even portable, providing you can keep it dry (it probably isn’t weather proof).
The rotator itself is mostly 3D printed (including the gears and gearboxes), all you need is some cheap threaded bar, two NEMA 17 stepper motors, a couple of 3D printer motor drivers, a couple of sensors (cheap breakout boards), a couple of 3D printer belts, a cheap buck convertor, four cheap readily available bearings, a cheap (£7 if you shop about) ESP 32, and a bit of perf board to mount everything on and a bit of waste pipe from B&Q to mount the antennas on. This is a very reproducible project.
When turning on, it uses sensors to work out where north and level is, so all you need to do is turn it on and it will home itself (no setting it up to point north).
It has been designed to primarily work with Gpredict (satellite tracking software). There is no control cable for the rotator as it works over home wi-fi, simply enter its IP address into Gpredict.
To connect your rotator to your Wi-Fi network, simply turn on the rotator and wait for it to show up in the network list on your phone. Connect, enter your SSID and key for your network and that’s it.
After entering the IP address of the rotator into Gpredict, it’s simply a case of opening the rotator control window, selecting a satellite and telling it to track (click Track and then Engage). After tracking, click the Engage button to disconnect from the rotator. The rotator will then unwind (in case wires have wrapped around) and home itself to north and level.
This is still in the early stages, but there are plans for the rotator to be able to access a satellite positioning API over the internet, so all you’d have to do is connect the rotator to the internet (your phone if you are portable), select a satellite from a list (on some sort of touch display) to have the rotator would track that satellite. The rotator will also rotate more than 360 degrees, so doesn’t get hung up when passing through north like some rotators.
While the satellite isn’t easy to carry long distances, it could be used on a tripod at special events and other portable locations accessible by car.
![]()
3rd prize – Laurence Fletcher, G4SXH
Langstone transceiver
![]()
This project is my version of the Langstone SDR transceiver, based on the design by Colin Durbridge, G4EML. Colin’s clever design is based on a Raspberry Pi 4 computer and the Analog Devices Pluto SDR module. I built my project over the Christmas holidays, completing it at the beginning of the third COVID lockdown.
For some time now I have been experimenting with the QO100 satellite using hardware I have cobbled together combined with SDR Console running on a laptop PC. There are several issues with this approach which affect the enjoyment of operating through the satellite. For example, SDR console is very complicated and like other PC-based software is prone to problems with drivers, settings and crashes.
Although the Langstone transceiver uses SDR, the user interface is very simple and runs reliably on the Linux-based Raspberry Pi. My motivation for building it was that I wanted something that gave an operating experience more like a traditional transceiver.
The transceiver is tuned using the scroll wheel on an old PC mouse plugged into the USB port at the back. Later I plan to cannibalise the mouse to make a tuning control mounted on the front panel.
![]()
Highly commended – Robert Lynch, M0NVQ
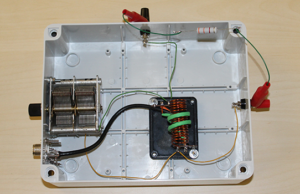
Building the M0UKD End Fed Half Wave Antenna Coupler (EFHW)
When the COVID lockdown was partially lifted during October 2020, I planned a four-night stay at one of the National Trust cottages at Fountains Abbey in Yorkshire. This would be an ideal opportunity for portable radio operation in the countryside away from domestic electrical interference.
I had previously tried a variety of portable antennas, but I didn’t feel any were suitable to take with me due to the problems I had encountered on previous trips. For example, an inverted V half wave dipole for the 40 metre band also resonant on the 15 metre band from a 10-metre-long fibreglass telescopic pole had functioned well. Similarly, an inverted V half wave for the 20 metre band had functioned well. However, the weight of the coax always severely bent the pole.
I had tried a random wire antenna with various matching units and earth systems, but encountered problems in getting a consistently low SWR. A stainless steel screw ground stake in the ground with a fan of counterpoise wires seemed to give some improvement, but tuning for low SWR was not consistent.
With the stay in Yorkshire coming up I searched on Google and came across the M0UKD End Fed Half Wave Antenna Coupler. Visiting the web page I set out to make as close an exact copy as possible.
Parts were easy to obtain and construction was not difficult. Since the antenna coupler effectively matches the 50 ohm transceiver to the anticipated 3200 ohm end fed half wave wire, I connected a 3200 ohm resistor as a dummy load and found that the unit would match to any frequency on the 40, 20, and 10 metre bands. I removed the dummy load and connected about 19.6 metres of wire (and 2 metres of counterpoise) and found the unit would match right across the 40, 20, and 10 metre bands.
And so this was the antenna setup I was able to take with me to Yorkshire in October 2020. I found the single wire for the three bands did not bend my telescopic fibreglass pole at all. The single two metre counterpoise was easy to accommodate. All in all, set up time was probably only 10 minutes including checking the SWR with my GQRP Resistive SWR Bridge that I had made earlier.
QSOs included G1HHD on 40m, DK8SL on 40m, G4VSJ on 40m, G6AD on 40m, and F4GZJ on 20m: all at 5 watts.